|

| Site Partners: | SpotterGuides | Veloce Books |
| Related Sites: | Classic Cars Monthly | Your Link Here |
|
|||||||||||
|
|||||||||||
 3 Jan 2022, 17:34 (Ref:4092356)
|
#2601 | ||
|
Veteran
Join Date: Aug 2007
Posts: 1,974
 |
Managed some hours getting the engine to a dry build, ready for cam timing and valve interference test.
This too k ages, partly due to my stupidity. I ordered the cams and forgot to tell them to delete the rear drive pots on the back of the cams as James had warned me. Forgot. So, spent some time sawing the stubs off and levelling the back, bit nerve wracking on a pair of ?1300 cam shafts, but all done. Cast iron is nice to cut! Checked the fit of the woodruff key in the cams and found them too tight so out with the needle files and some carful thinning of the keys and all was well. Built the cylinders up missing out #2 and #5 as not needed for this task. Assembled each side with the engine on it's side so gravity was always keeping the chains in place and slowly got it all together, just the rockers in #1 and #4 heads to fit and I'm ready for endless fun with the DTI gauge. However, for a bit of relaxation, helping a fellow DDK'r take his engine out of his 911 tomorrow. 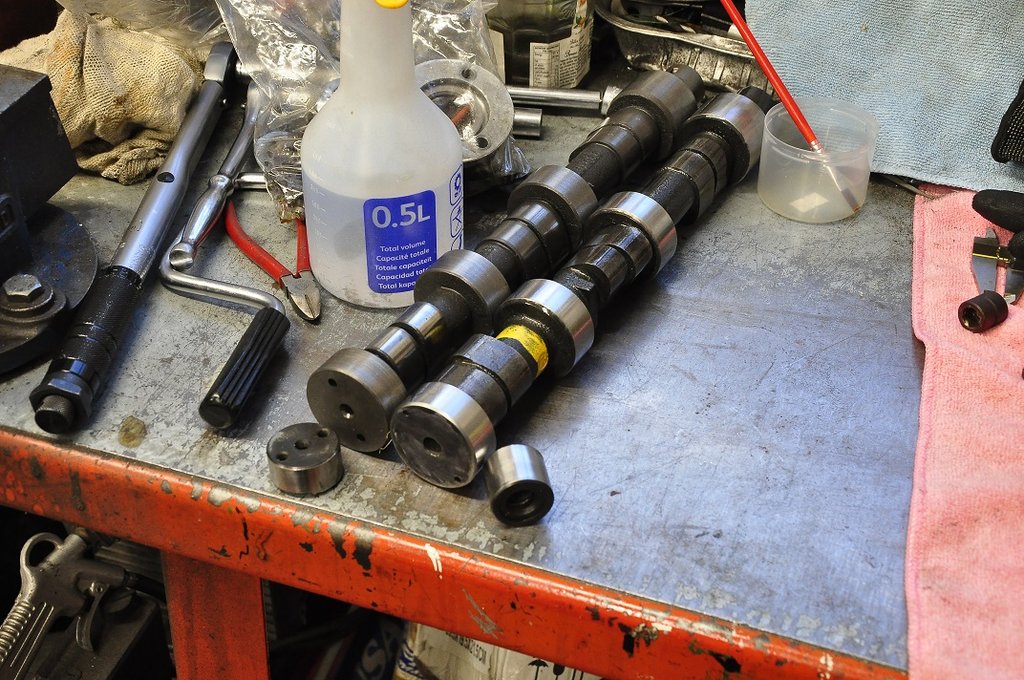 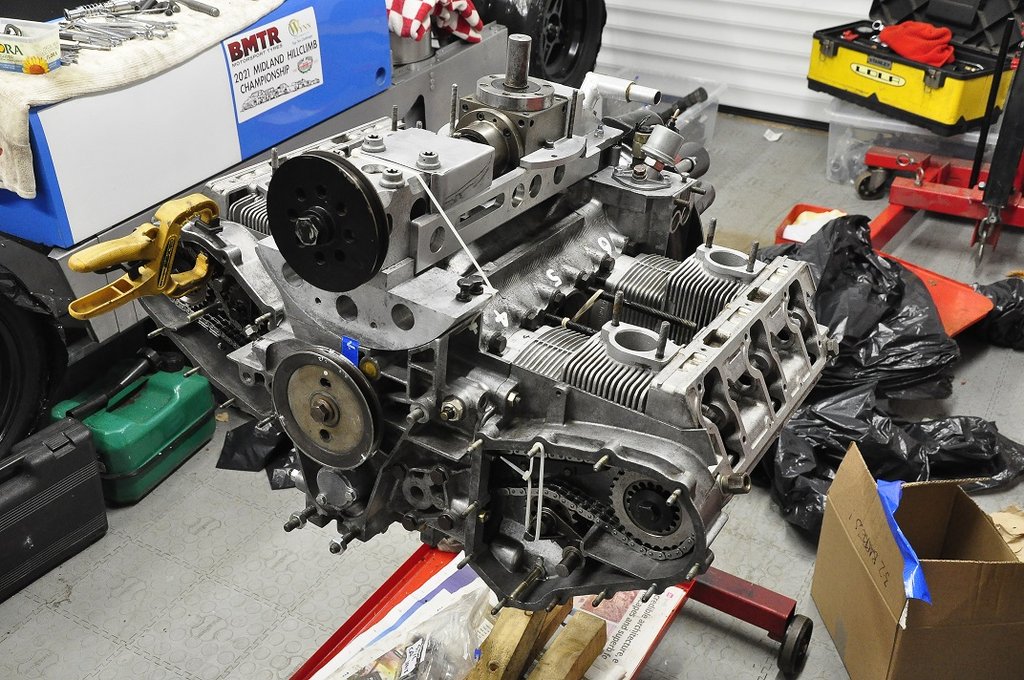 
|
||

|

|
|
5 Jan 2022, 17:53 (Ref:4092604)
|
#2602 | ||
|
Veteran
Join Date: Aug 2007
Posts: 1,974
|
Spent several hours on the dry assembly to conclude it.
Got the cam timing of the GE60 to 5mm (range is 4.8 to 5.2) on both sides. The LHS came on 5mm first setting! The RHS came on 4.7mm and took several iterations to get to 5mm. So far, so good, then the evil bit, checking the valve to piston gaps... Started with the LHS inlet and clearance is 2.5mm (min is 1.5mm allowed) and thus lots of room. RHS inlet was 2.35mm LHS Exhaust was 3.25mm (2mm minimum allowed) RHS Exhaust was 3.25mm Phew, all ok and room to spare. Will check it all over gain tomorrow and then tear the lot down. Have the loan of a DDK ring gap grinder, so gapping all 12 rings next which will be a joy. Just one pic covers 3 hours. 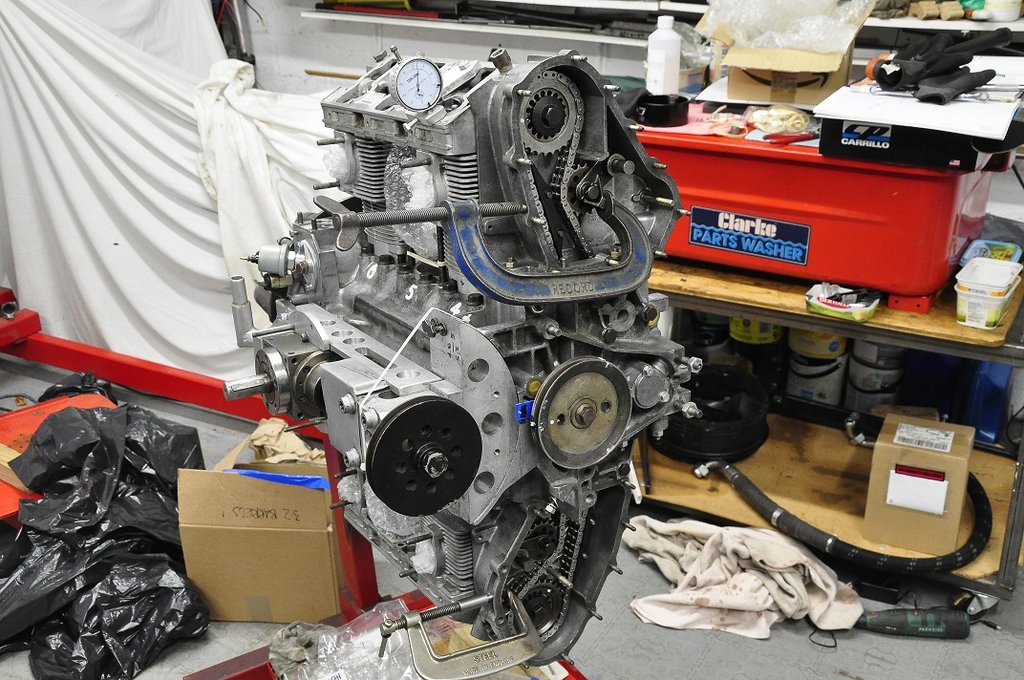
|
||
|
|
|
|
7 Jan 2022, 10:02 (Ref:4092754)
|
#2603 | ||
|
Veteran

Join Date: May 2013
Posts: 10,046
|
After all this fantastic job and all the costy parts involved, will you dare to go flat out?
|
||

|
__________________
Celui qui est parti de rien pour arriver nulle part,n'a de merci a dire a personne.Pour ceux qui vont chercher midi a quatorze heures, la minute de Vérité risque de se faire attendre longtemps.
|
|
7 Jan 2022, 17:51 (Ref:4092798)
|
#2604 | ||
|
Veteran
Join Date: Aug 2007
Posts: 1,974
|
Doubt it! Getting too old for this Young Man's Sport...
Spent hours this afternoon doing the rings which are going well with a few niggles but found a real problem (of course). Positives of the Day: Gapped the rings using Peter's grinder which works a treat. This grinder is a luxury compared to needle files. You made me smile Peter! One piston at a time matched to the barrel. Done 4 , 2 to go. All gaps were too tight, so managed to tweak then bang on. Top ring has to be 17 thou, second ring 6 though wider, so 23 thou. Generally the top ring as supplied was 12 to 15 thou and the second 18 max. The real sod is getting the oil control ring set in, what a game but my skill is getting better with practice and no swearing. Patience is not my middle name but you just have to take your time. Negative of the Day: The C clips to retain the wrist pins are HUGE compared to the Porsche items. So thick and REALLY difficult to get into the piston grove. My home made (from soft duralumin) was ovalized by the resistance to fit the clip. I did get one in place but silly effort. Asked the piston supplier if the clips were correct and they are. He wished me luck. There is no way you an fit these clips when assembling the engine using fingers and a screwdriver. I know I can fit 6 beforehand but they are murder with the piston in a vice! Going to remake my Stompski knock-off tool in steel and see if that works. I doubt the Stompski tool would grapple with these clips. The bad weather continues here, so should get Saturday to finish the cylinders and a bit more. Doubt my steel will arrive. Will also contact the rolling road man to see how he feels about th Clewett ignition system, the simple (cheap) one. It should at least bolt on and work, right? 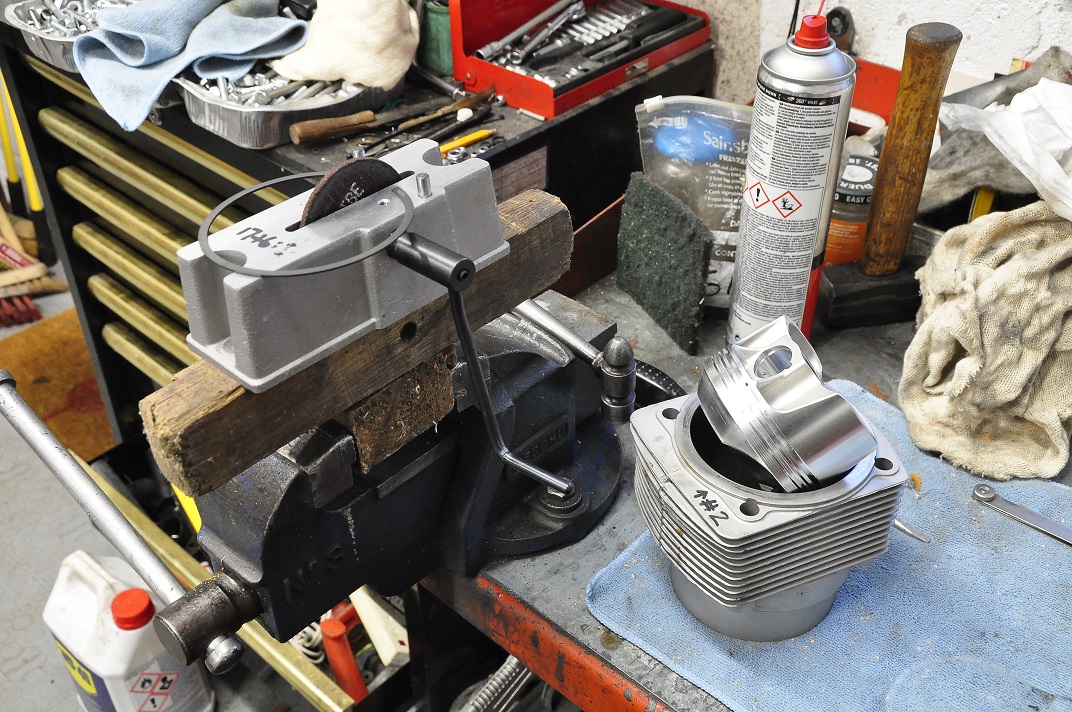 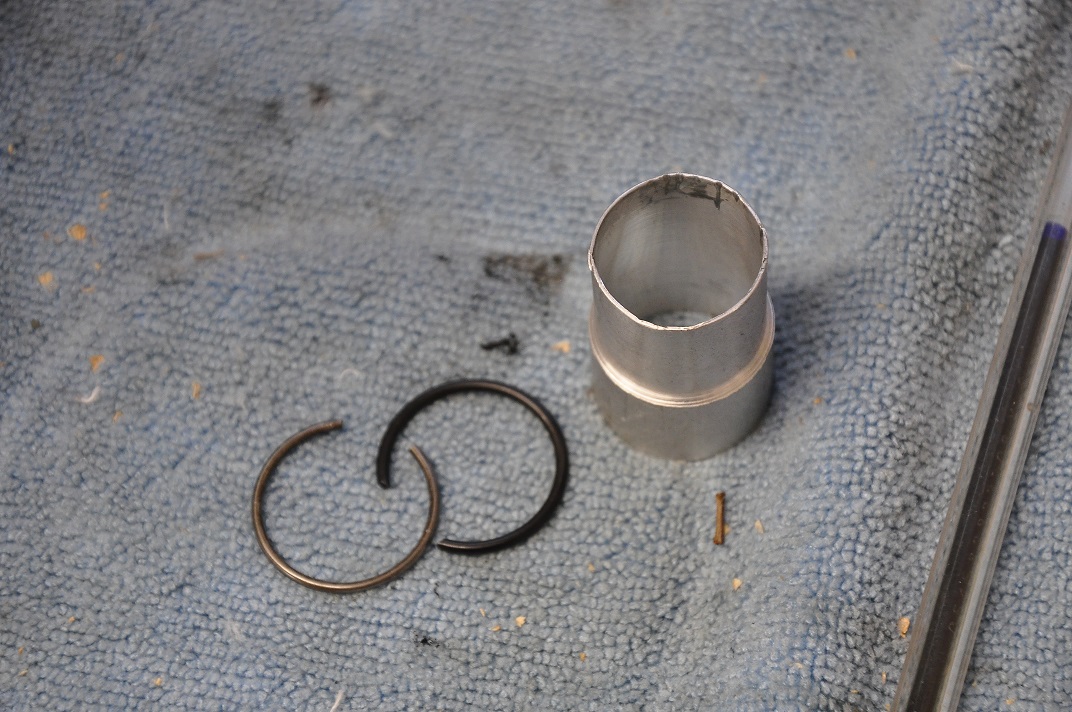
|
||
|
|
|
|
11 Jan 2022, 16:50 (Ref:4093320)
|
#2605 | ||
|
Veteran
Join Date: Aug 2007
Posts: 1,974
|
A full 6 hours in the garage today, and much done.
The 6 piston clips were irritating me, so assembly of the pistons/barrels/clips etc weighed heavy on my mind through last night. Still, all went well!!! I tuned my Stomski knock off tool and all 6 nasty clips went click into place. Amazing to say the least. The trick is to machine the outer sleeve to 5 thou smaller than the wrist pin, machine the inside dia as thin as you dare go and still have some wall thickness, I got down to 15 thou. Press painfully these thick wire clips in, tilt at an angle and get the open ends into the piston groove, mostly done blind, adds so much to the fun. All in and the cylinder down and clamped in place. The ring compressor is unbelievably good, never will I use anything else. Oil ring gaps at 12 noon, second ring gap at 9.00 and the top at 3 o'clock. Buoyed by this lot, carried on. Heads on after a final clean of the mating surfaces yet again, all loosed on, barrel nuts greased with assembly lube from ARP and loosed down. Cam carrier prepped, oil tubes in and torqued down a treat followed by the head torques. Cams install ok and rotate a treat on both sides. Slowly all the holes are filling up! Out walking tomorrow for some Shropshire air and hope to shim the cams and even time them on Thursday. Rocker shaft seals arrived today. Ordering the Clewett ignition tomorrow. 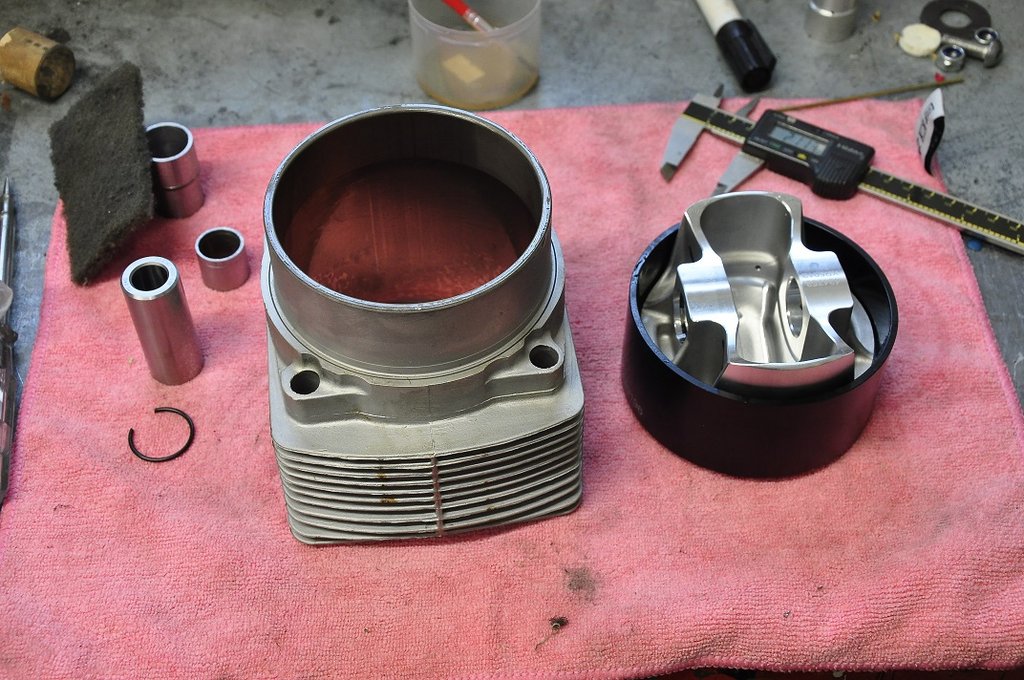 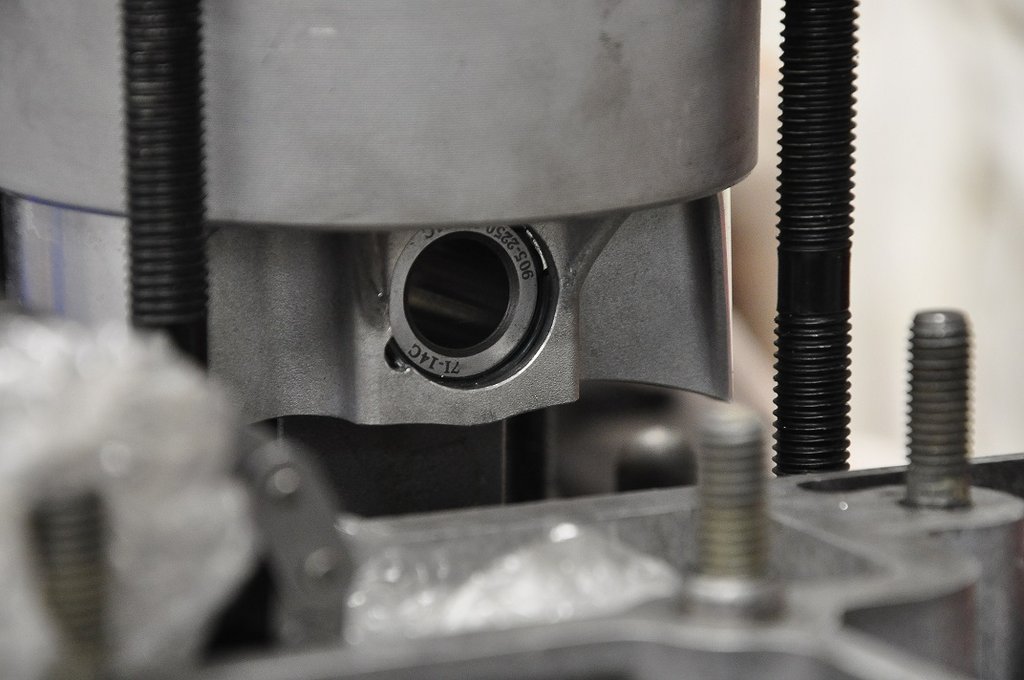 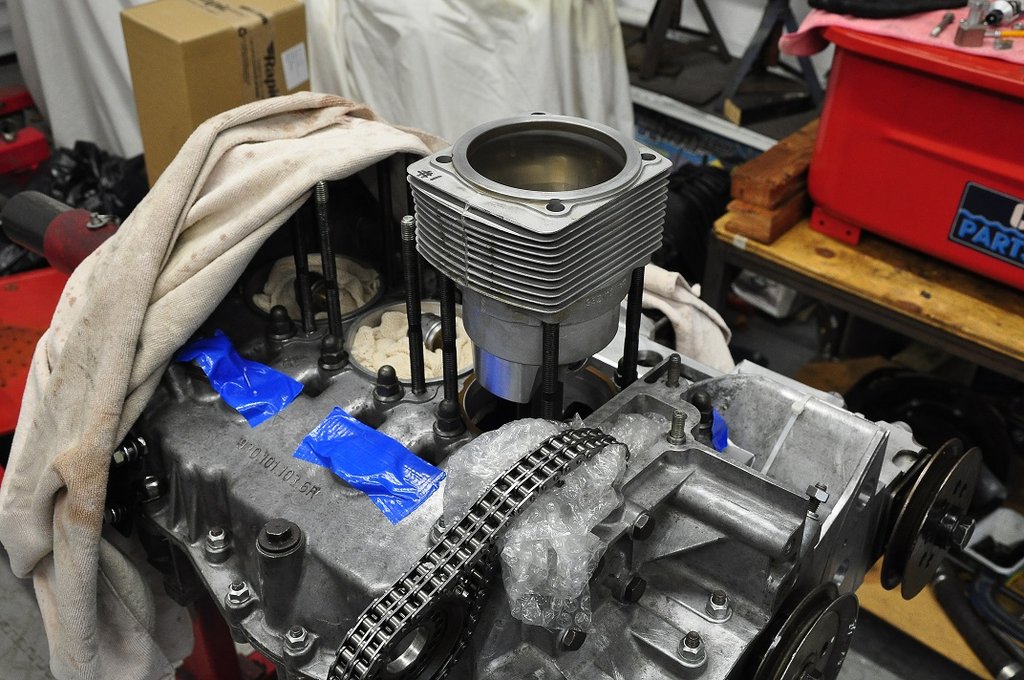 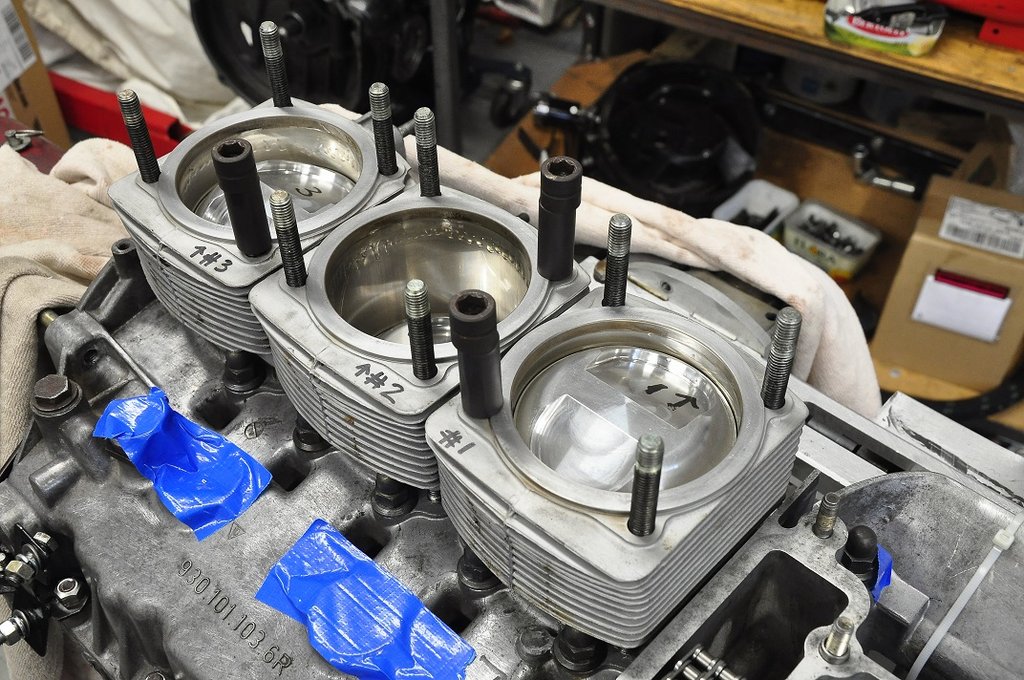 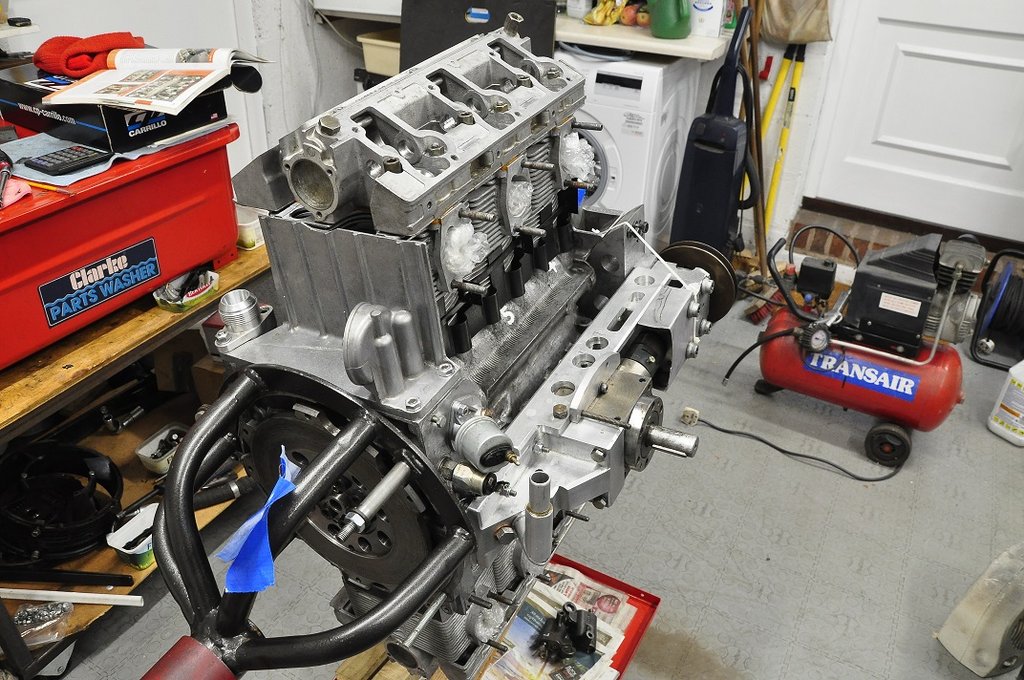 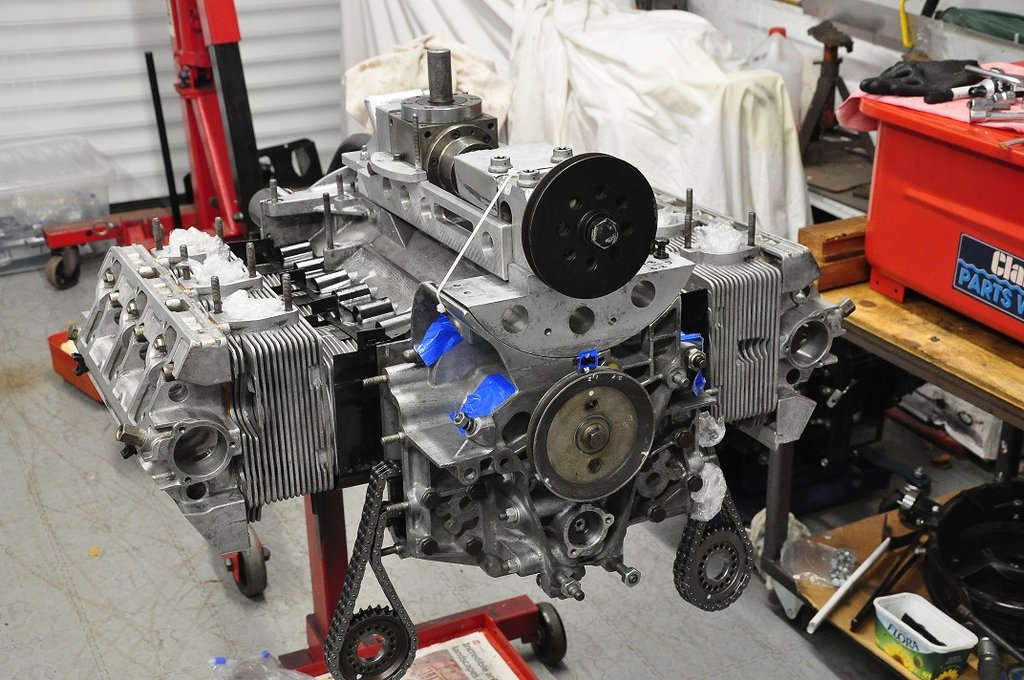 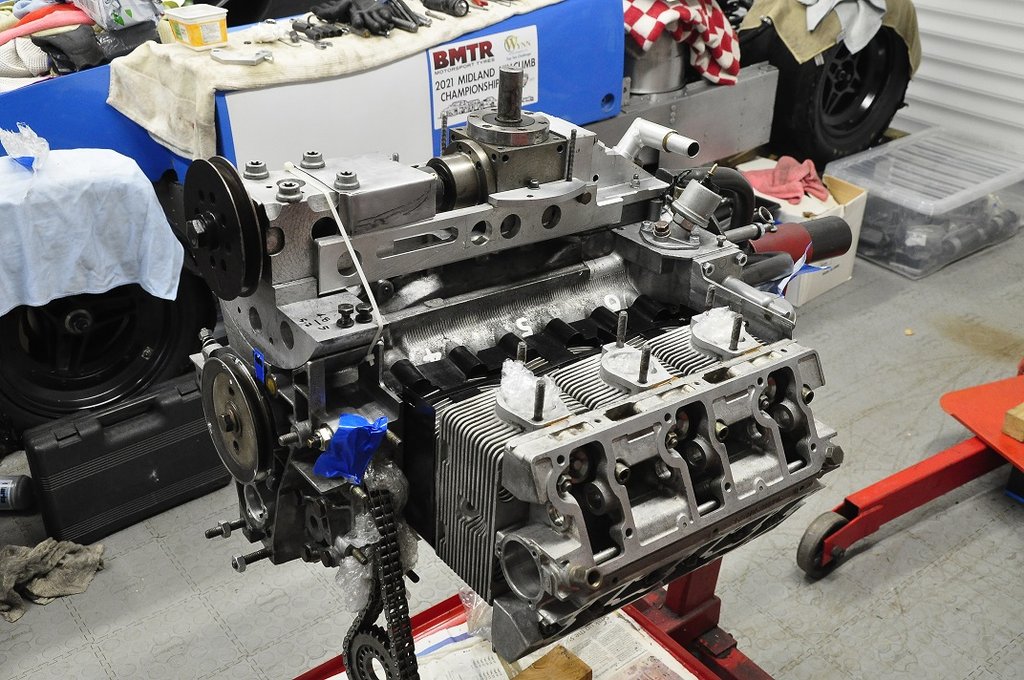
|
||
|
|
|
|
14 Jan 2022, 17:19 (Ref:4093759)
|
#2606 | ||
|
Veteran
Join Date: Aug 2007
Posts: 1,974
|
More hours poured into this engine, but good progress!
The chain sprockets needed aligning esp with new cams, and the alignment was miles out with shims where they were last time. Frustratingly awkward to get all the dimensions accurately measured and sorted. Had to make a shim for the one side as I used all the others up. Having a lathe is a god send. All done and with in the factory tolerance. Then to the cam timing which again is a fiddle and lots of iterations to get to the 5mm timing dimension. Then came doing the cam bolts to 84 lbft which is easier said than done The cam restraining tool I made worked a dream and I just about had the pull to click on 84. Awkward with the engine balanced on the stand. All done, so moved on to the chain tensioners and found the engine was missing some spacers to stop the idlers floating along their pivot shafts. So, turned to the lathe and machined a pair and all is well, side play of 8 thou. To feel better, added the cam covers! So pleased to have all that behind me now, simple stuff next, but dreading all those RSR seals.  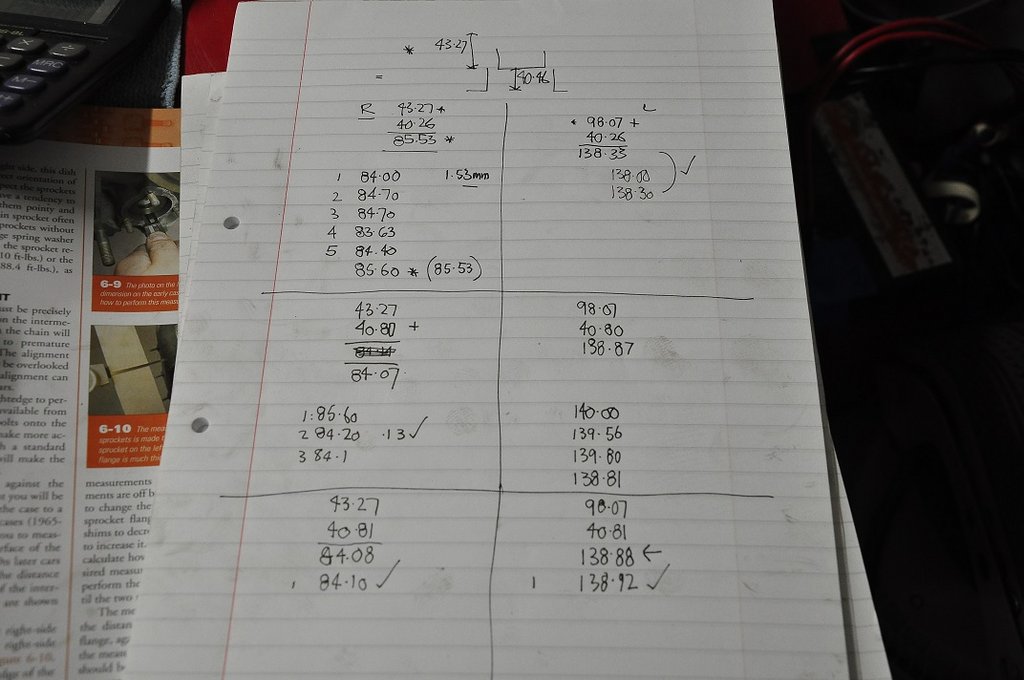 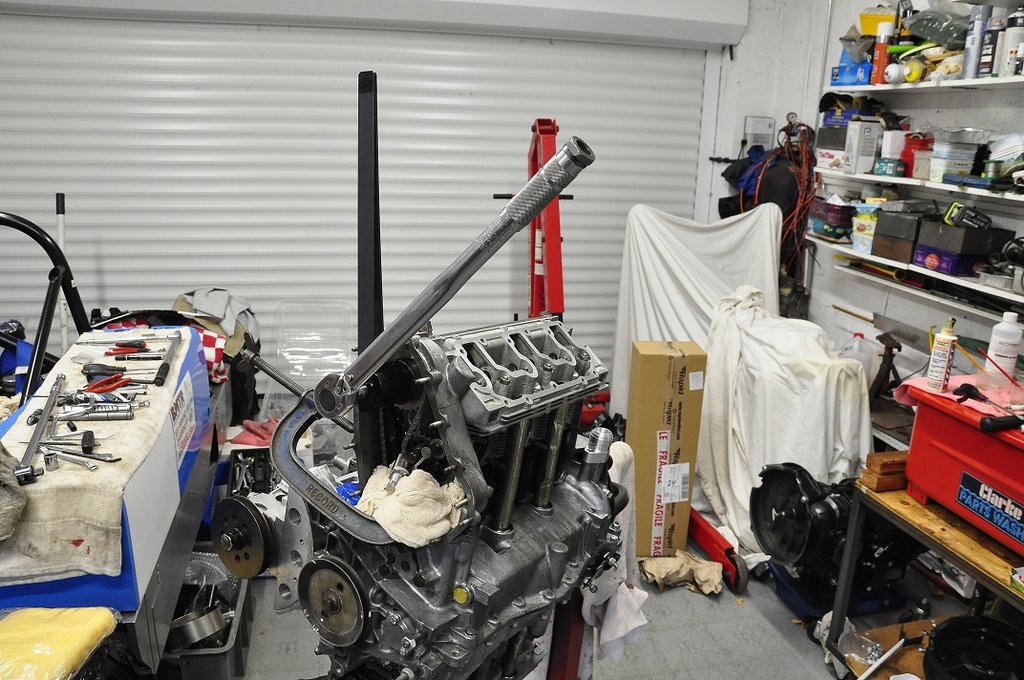 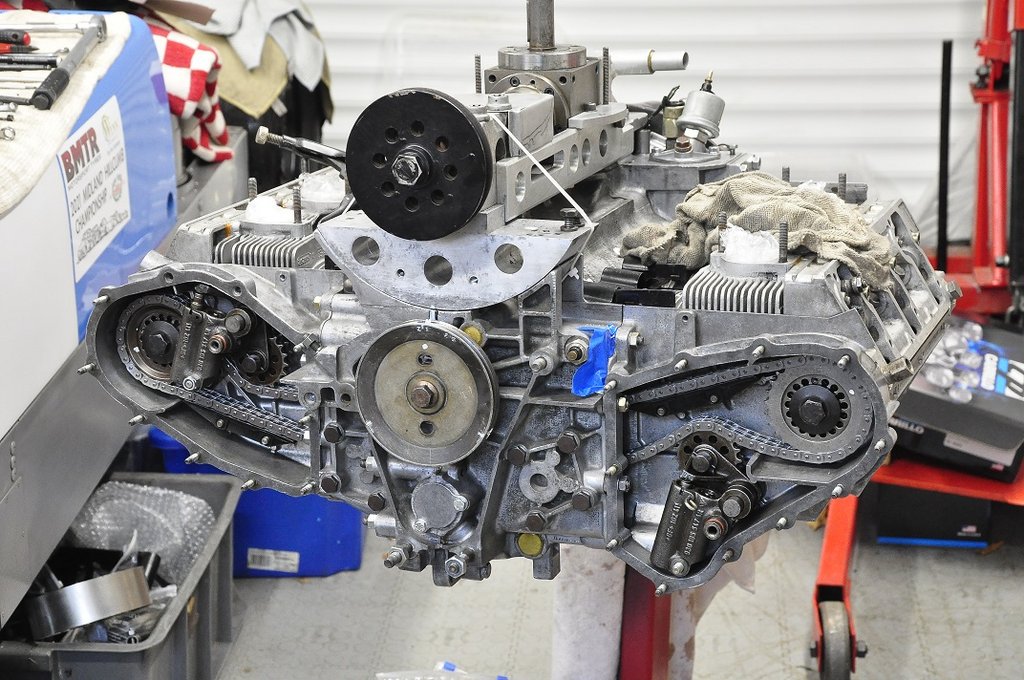 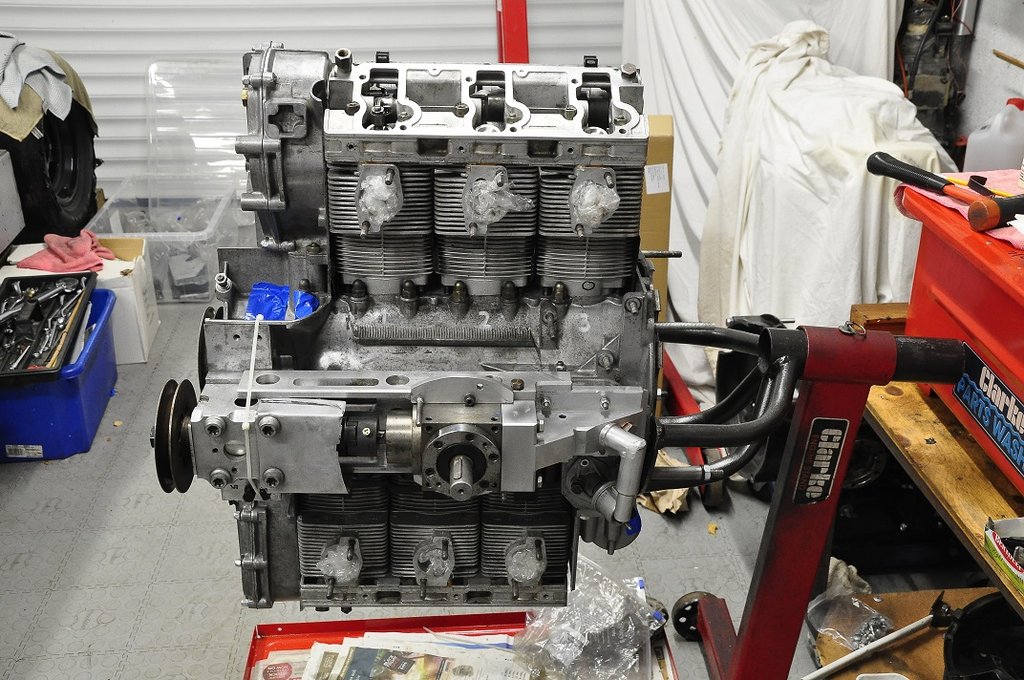
|
||
|
|
|
|
20 Jan 2022, 13:08 (Ref:4094577)
|
#2607 | ||
|
Veteran
Join Date: Aug 2007
Posts: 1,974
|
few more hours doing the simple stuff on this engine before the next challenge of the ignition system.
The oil lines are all in, simply cleaned and new alum alloy seal washers everywhere, nice and simple. The custom made fan shroud next after a re-paint. This is a master class of thin aluminium sheet formed and rivetted to go around the engine, made by Crispin Manners I think about 25 years ago. Followed by the DIY paper gaskets and insulators and finally the carbs. Gave the carbs a good external clean down, been 5 years since they had some tlc. These are a sod to fit due to the two nuts on the middle cokes where they bolt to the heads, access is certainly limited, but all on using K nuts. Next will be making the stands for the Clewett ignition coil packs which I intend to mount on the engine front cross beam a cut-n-shut 911 item. No news from Clewett on delivery (story of USA parts for me) but could be next week..maybe. 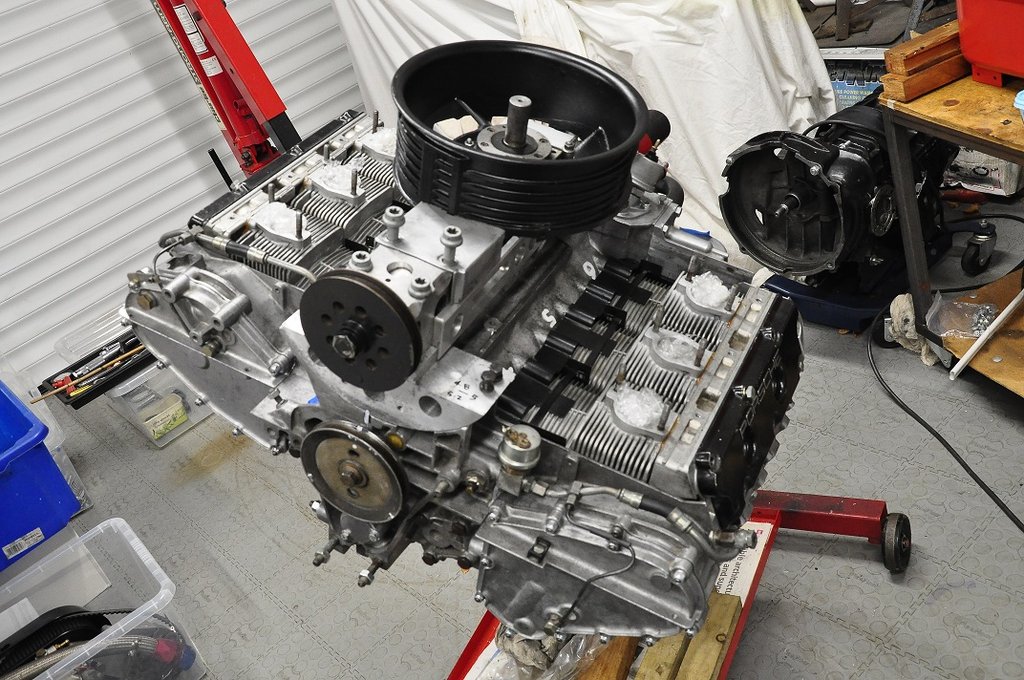 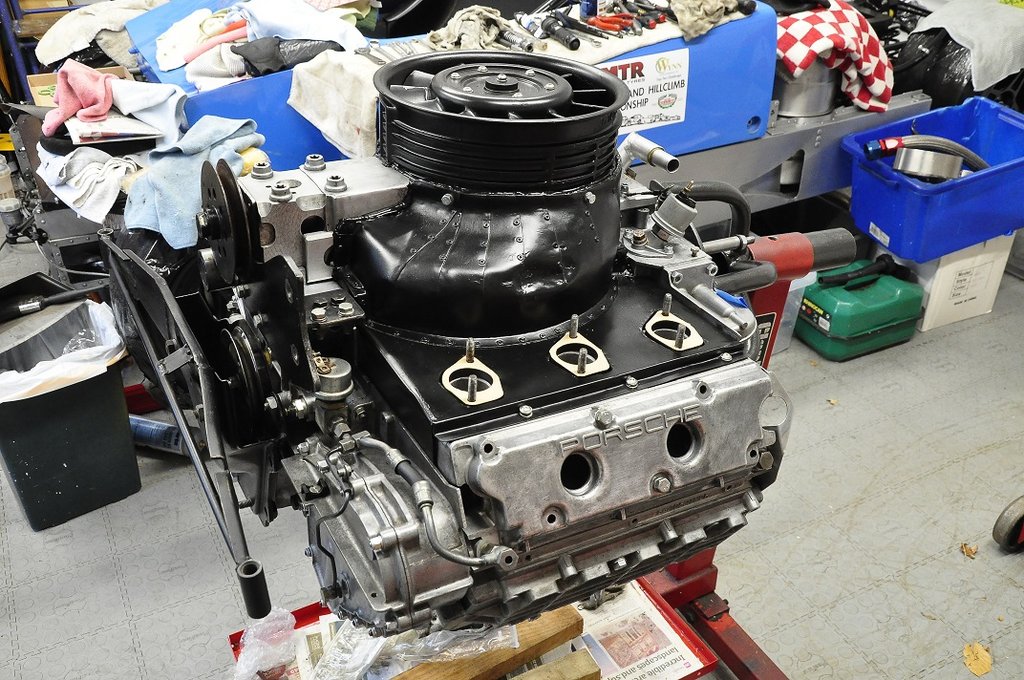 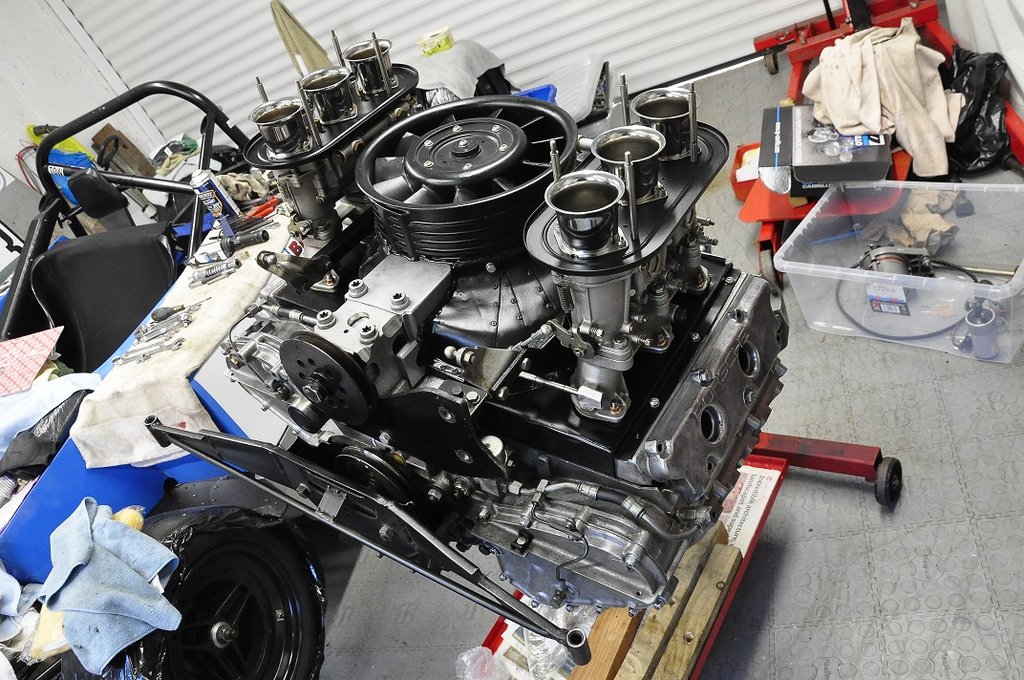
|
||
|
|
|
|
26 Jan 2022, 16:53 (Ref:4095419)
|
#2608 | ||
|
Veteran
Join Date: Aug 2007
Posts: 1,974
|
Clewett box arrives tomorrow, so have been detailing the engine to get the system wired-up.
The lower rocker covers need mods to get access to the extra plugs, so holes drilled, webs trimmed to allow the plug cap boots to fall flat and seal to the covers, additional support brackets added to keep the plug cap in the right position and a few other things. When I first built this engine in 2009 (!) I added turbo bottom covers, bought from Andylightweight and one had been drilled for twin plugs, so I had a good template after checking dimensions. This all took many hours, oh for a nice milling machine! The Clewett comes with 2 x 3 coil packs that have to be mounted somewhere; some space was found and a custom light bracket made and bolted to the engine using holes already on the cam sprocket cover. I hope this will slightly hide away the modern look on the engine, will find out soon... This is the last big task on this rebuild, but I'm not looking forward to all the wires and good routing. About 15 meters needed! As famously quoted, "What can possibly go Wrong?" 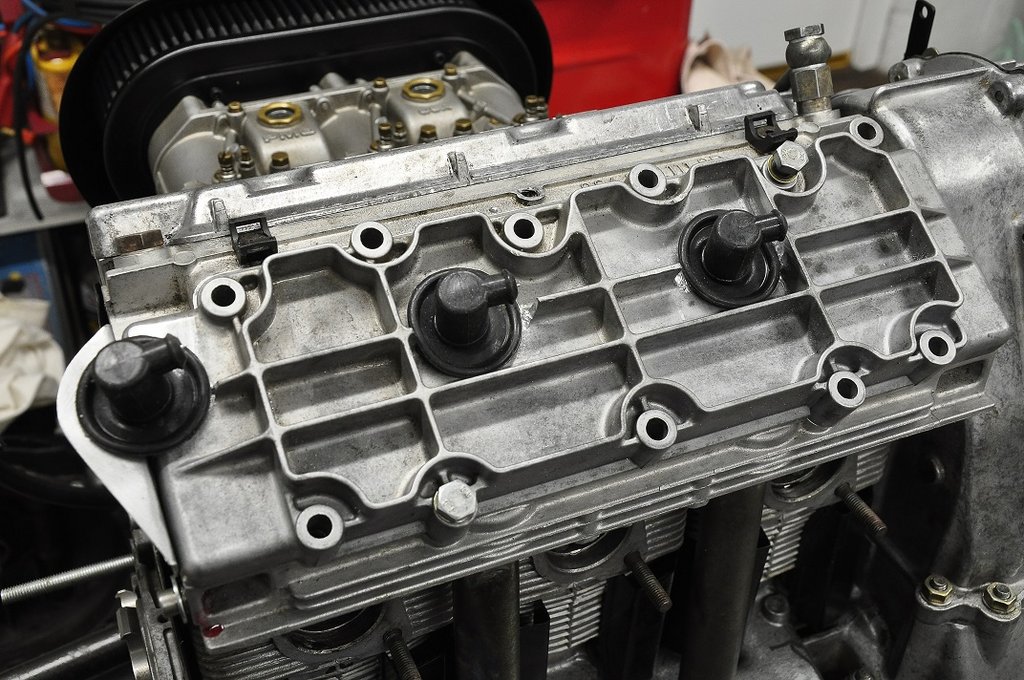  
|
||
|
|
|
|
27 Jan 2022, 16:14 (Ref:4095547)
|
#2609 | ||
|
Veteran
Join Date: May 2013
Posts: 10,046
|
Well done the little bracket to hold the last plug cap. You run a one coil for two plugs system? What a piece of kit with the horizontal fan!
|
||
|
|
__________________
Celui qui est parti de rien pour arriver nulle part,n'a de merci a dire a personne.Pour ceux qui vont chercher midi a quatorze heures, la minute de Vérité risque de se faire attendre longtemps.
|
|
28 Jan 2022, 09:13 (Ref:4095641)
|
#2610 | ||
|
Veteran
Join Date: Aug 2007
Posts: 1,974
|
FedEx are having a lot of difficulty getting the Clewett ignition system from Bedforshire to Wolverhampton.
Might even arrive today, but after yesterday, not at all sure. Should get the Post Office to deliver the box, they know how to do that. Here is the expected Clewett system: 
|
||
|
|
|
|
28 Jan 2022, 17:10 (Ref:4095722)
|
#2611 | ||
|
Veteran
Join Date: Aug 2007
Posts: 1,974
|
After some faffin' about with FedEx, the Clewett box arrived. Heavy comes to mind!
Opened it all up to check everything is there, looked good. Started to assemble the parts on the engine, looked good. Fitted some looms that were ready terminated and worked out some routing to suit the car and how the current loom runs, looked good. Crank wheel and sensor dropped into place once a small corner of the engine mount was trimmed off, looked good. Wedding anniversary day today, but Mrs HC insisted we waited in to get this box grounded, so out in the Boxster tomorrow. Forgotten what the 911 even looks like, been in storage for an age now, but all dry and warm. Next step is the horrid bit, running all 12 plug leads to the plugs. On the subject of plugs, added the spacer crush washers to space the Iridium plugs back a bit, gained 1mm, but feels more comfortable. Gapped the plugs to 0.9mm gap, the correct gap for this level of tune. Rapidly getting there unless the crimping tool fails. Have to say, the Clewett product quality so far is 100% on the spot.  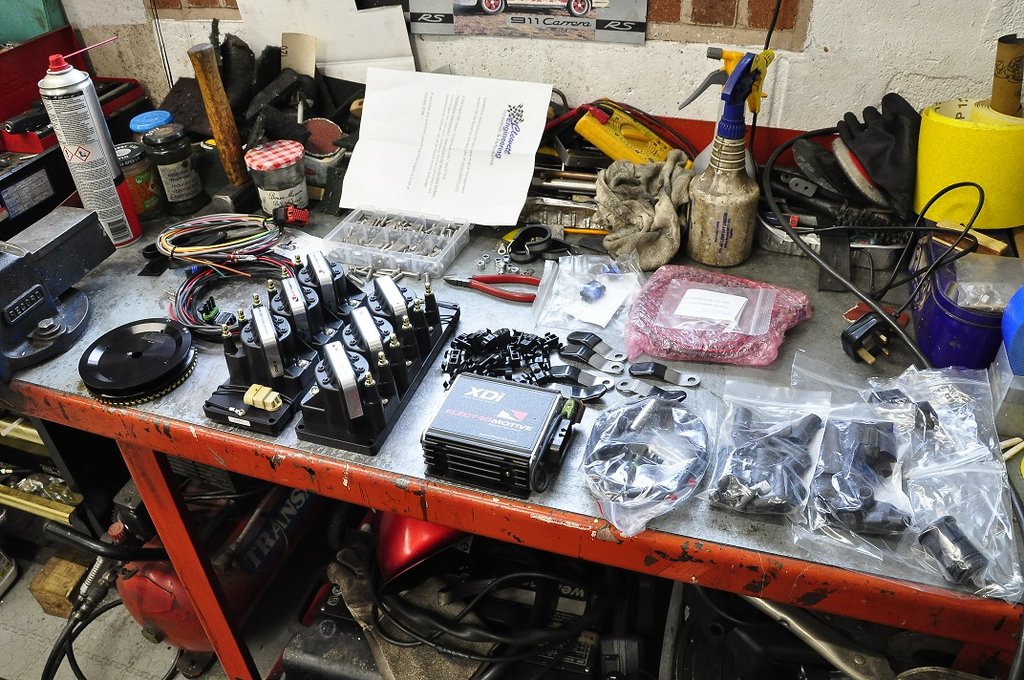  
|
||
|
|
|
|
4 Feb 2022, 17:21 (Ref:4097407)
|
#2612 | ||
|
Veteran
Join Date: Aug 2007
Posts: 1,974
|
Having a few days away totally in the Cotswolds has improved mu mojo, so spent the day continuing to 'wire' this 12 plug engine.
Neat n Tidy was the mantra, but also trying hard to keep these leads separated and away from the engine, no easy task. Armed with a gazillion clips I used some spare orange 2 core 240V cable to help me plan the routes, and it is stiffer though at 7mm dia smaller than the real lead cable which I will use. It is surprising how many unused tapped holes there are on this engine so managed to do it all without drilling the engine (!) I think the pics say more than my clumsy words can. Rocker cover bolts modified to carry the insulating cable clips:  Left hand side with all the routes sorted:  Right had side much harder:  This engine has to go in the chassis first and the front support bar slipped into place and onto the engine, so some of the looms has to be removable, rest is all 'on-board'. Have bought a substantial crimping tool off ebay to crush the steel (!) coil pack terminals to the leads, and have ordered some spare ones for those I will cock-up..... Expecting to have all the leads cut to length and in place by end of the weekend. Also expecting to have the engine back in the car, box on with a fresh clutch friction disc and the 'ecu' in place somewhere in the cabin. That means some fiddly wiring, not my favourite task. Start-up getting close. |
||
|
|
|
|
5 Feb 2022, 17:14 (Ref:4097495)
|
#2613 | ||
|
Veteran
Join Date: Aug 2007
Posts: 1,974
|
Bet everyone is almost as sick of this engine wiring as I am.
BUT, now done, or at least the spark lead side is. Gave up trying to stop 12 leads from touching each other. I'm working on the 'dream' that with everything being new the spark will want to jump the plug and not to the engine. Time will tell. First, bought a £37 crimping tool off ebay. It is utterly fantastic, and worth every penny. Could not do all this without it. The £4 green plastic crimping tool is best left as 'Not fit for Purpose' Guessed the lead lengths I needed at 15 meters, and ended up with 2 meters over, could come in handy. Lots and lots of hours have gone into this whole sparky affair and we are not done yet! Plug clips to be done on the lower covers tomorrow, cam lube on the lobs and fit the covers for the last time. They didn't leak before, but crossing my fingers for this time. I can then fit the ex manifolds and prep things for fitting the engine into the chassis before finishing off where to mount the control unit which might be trickier than it sounds.  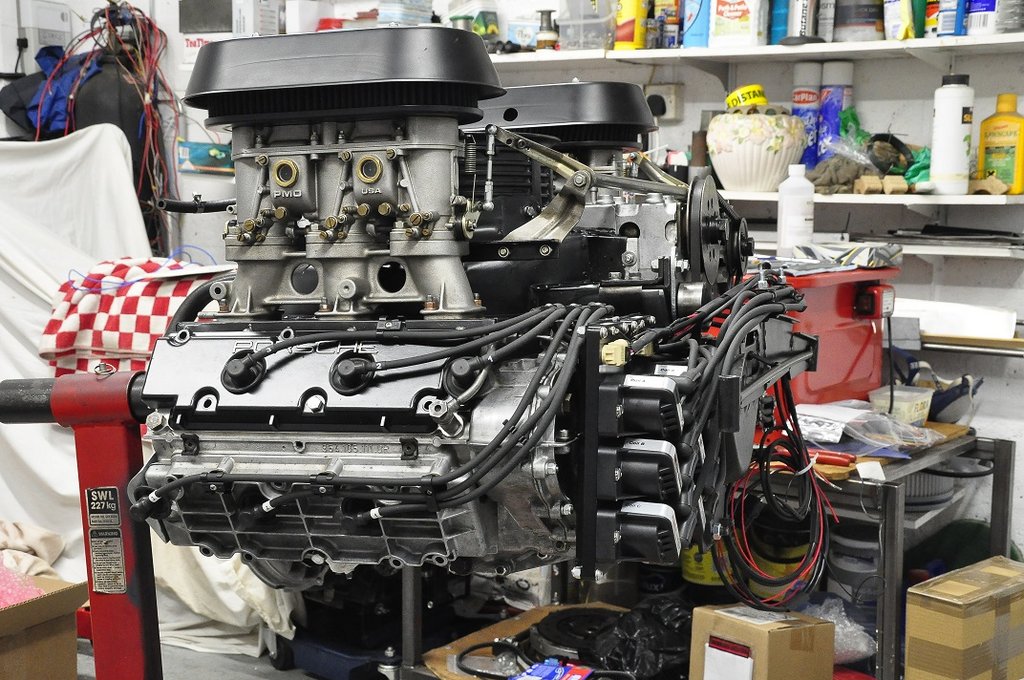 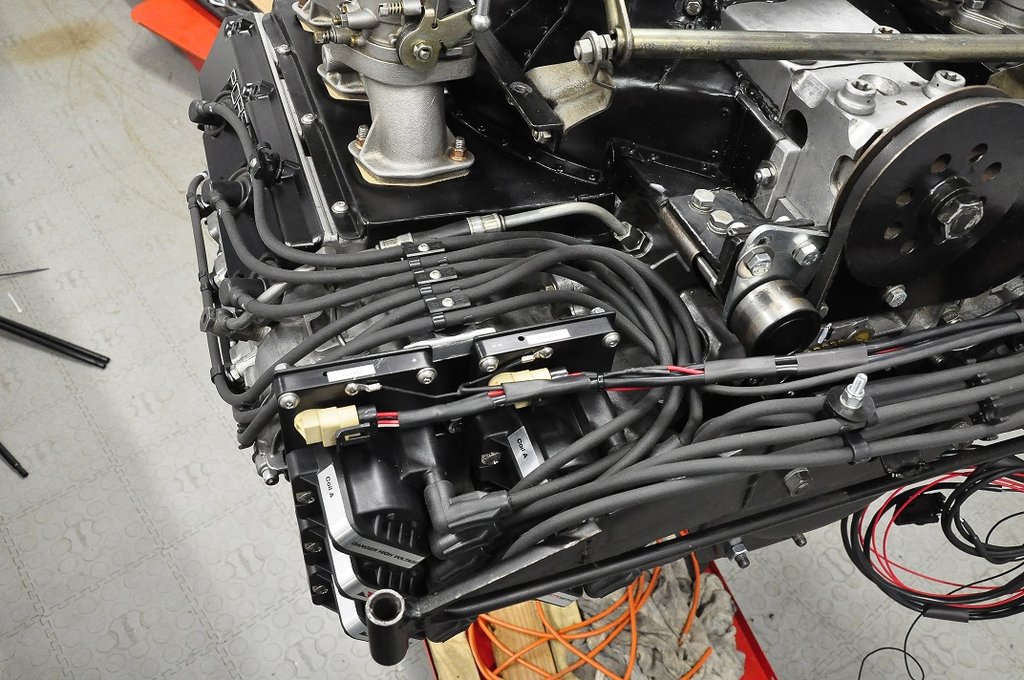 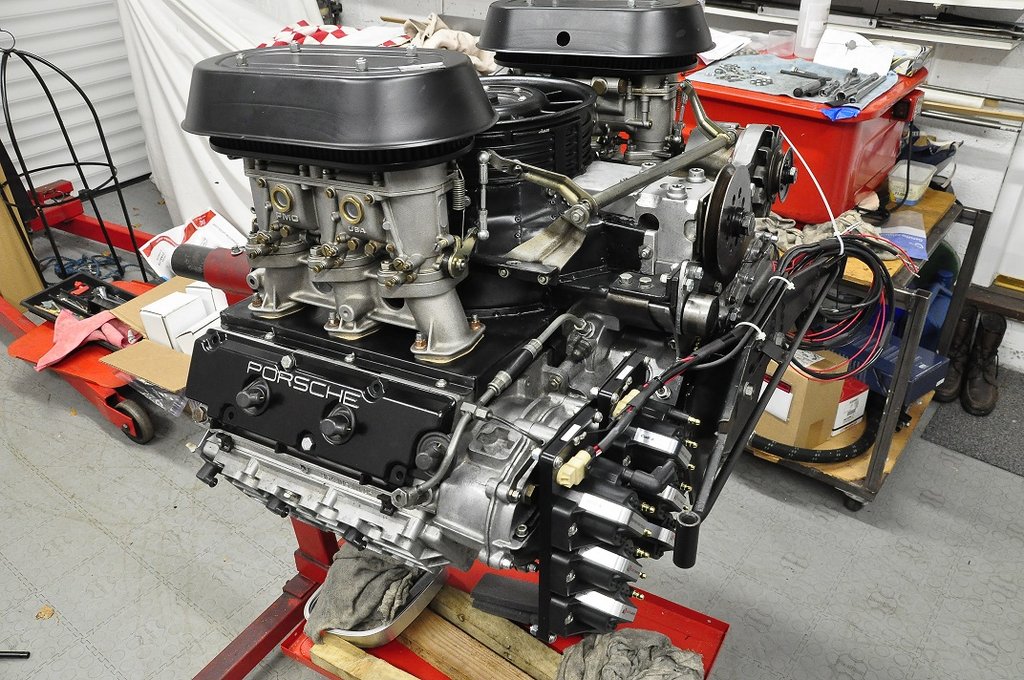
|
||
|
|
|
|
5 Feb 2022, 17:17 (Ref:4097496)
|
#2614 | ||
|
Veteran
Join Date: Aug 2007
Posts: 1,974
|
Bet everyone is almost as sick of this engine wiring as I am.
BUT, now done, or at least the spark lead side is. Gave up trying to stop 12 leads from touching each other. I'm working on the 'dream' that with everything being new the spark will want to jump the plug and not to the engine. Time will tell. First, bought a ?37 crimping tool off ebay. It is utterly fantastic, and worth every penny. Could not do all this without it. The ?4 green plastic crimping tool is best left as 'Not fit for Purpose' Guessed the lead lengths I needed at 15 meters, and ended up with 2 meters over, could come in handy. Lots and lots of hours have gone into this whole sparky affair and we are not done yet! Plug clips to be done on the lower covers tomorrow, cam lube on the lobs and fit the covers for the last time. They didn't leak before, but crossing my fingers for this time. I can then fit the ex manifolds and prep things for fitting the engine into the chassis before finishing off where to mount the control unit which might be trickier than it sounds.
|
||
|
|
|
|
5 Feb 2022, 18:22 (Ref:4097502)
|
#2615 | |
|
Rookie
Join Date: Feb 2007
Posts: 73
|
Well I for one am not sick of it. Its not the best bit admittedly, but it gets the project closer to the fire up that, tragically, I am quite excited about, having followed this thread from the off.

|
|
|
|
|
|
5 Feb 2022, 19:19 (Ref:4097506)
|
#2616 | ||
|
Veteran

Join Date: Jul 2003
Posts: 6,791
 |
I sincerely hope you're going to do a video of the first fire up like the F1 teams do!
Sent from my AC2003 using Tapatalk |
||
|
|
__________________
Midgetman - known as Max Tyler to the world. MaxAttaq!
|
|
5 Feb 2022, 21:21 (Ref:4097514)
|
#2617 | |||
|
Veteran

Join Date: Feb 2010
Posts: 6,082
|
Quote:
 Or minimum a few sound bites (bytes?) of it happening. 
|
|||
|
|
|
|
5 Feb 2022, 22:30 (Ref:4097517)
|
#2618 | ||
|
Veteran
Join Date: Aug 2007
Posts: 1,974
|
I'll be there with my camera shooting the video, teeth gritting and grindig as Ben nails the throttle to the floor.
God, what a stress that will be! I have a feeling it might be an anti-climax, but if it runs 300 bhp and sings round to 8000 red line without rattling, or going BANG! it will be a result for a home garage DIY build. It's been hard going so far, but the light is clear at the tunnel's end, so good. The time and money are draining, but Mrs Hillclimber is still ok. Interestingly, the number of hits on this engine rebuild on 10/10ths is 4 or 5 times greater than the 3 Porsche only forums where the posts are repeated. |
||
|
|
|
|
5 Feb 2022, 22:38 (Ref:4097518)
|
#2619 | |||
|
Veteran

Join Date: Oct 2011
Posts: 5,560
|
Quote:
Firstly, you seem to doing a grand job, Graham, and it's pleasing to note that the boss is still onside. As to view numbers, maybe it's that we on Tenths recognise class. Thanks for all your posts, and really looking forward to the start-up video. 
|
|||
|
|
|
|
6 Feb 2022, 13:43 (Ref:4097562)
|
#2620 | |||
|
Veteran
Join Date: May 2013
Posts: 10,046
|
Quote:
|
|||
|
|
__________________
Celui qui est parti de rien pour arriver nulle part,n'a de merci a dire a personne.Pour ceux qui vont chercher midi a quatorze heures, la minute de Vérité risque de se faire attendre longtemps.
|
|
12 Feb 2022, 15:59 (Ref:4098405)
|
#2621 | ||
|
Veteran
Join Date: Aug 2007
Posts: 1,974
|
Major outage of the internet today and the PC probs yesterday, waiting for the 3rd issue to arrive on the computer front...
Let's see how far this post goes! Friday, and the day in the garage to fit the engine and box back in and start linking up the essential connections. Going to leave the smaller stuff until the engine runs in case it has to come out again and goes in the skip. Cleaned the engine 'bay', got all the bits together, nut n bolts and prepped the clutch.  Checked the electrics again, 3rd time, and hoisted the engine off the stand after fitting the custom exhaust manifolds, tricky to make and 2 bolts very tricky to fit.  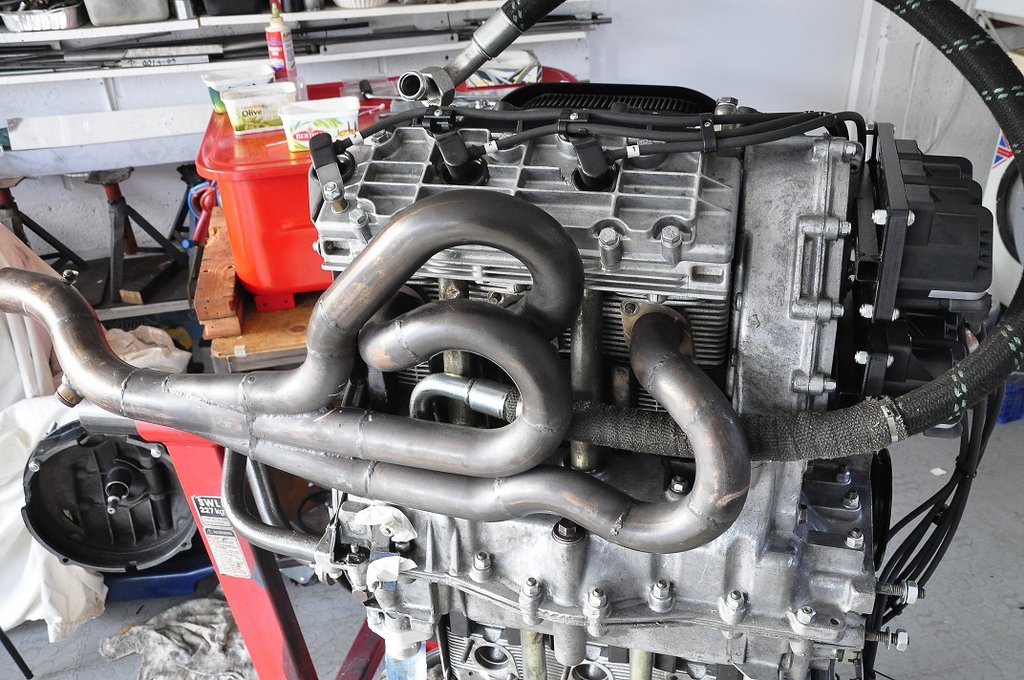 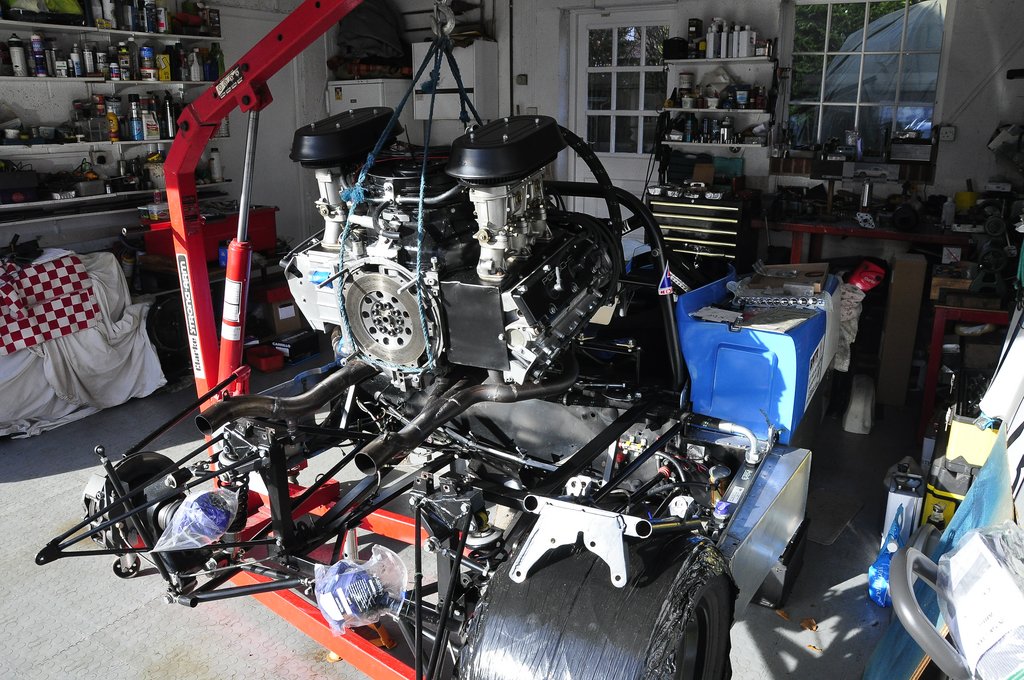 Pleasingly, all the clips and brackets for the wires all missed the chassis getting this fat engine into the skinny slot, the bay looks so big until the 3.2 is hovering above. Touch at a time saw the engine in and the front cross member into place and all lightly buttoned-up. You do the bolts up tight when the box is attached and mounted. The fresh clutch popped on and the box with it's WEVO shift gate fitted was cleaned externally and slipped into place just as it should. These jobs are sooo much easier using these tools. [url=https://postimages.org/] 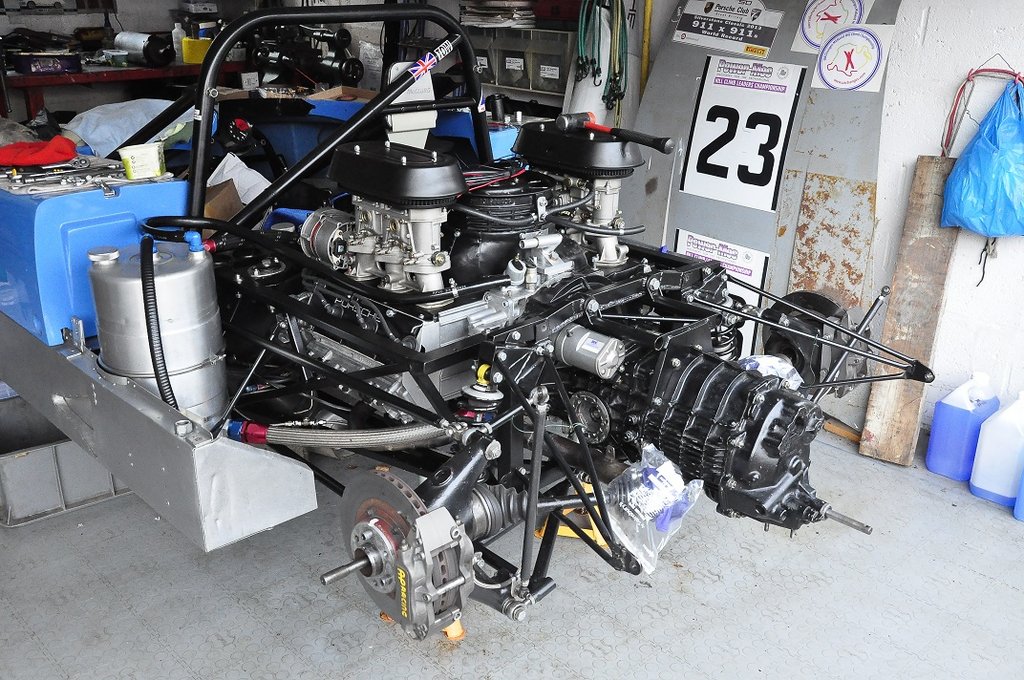 The new ignition system sort of blends into the old look of the car, the dry sump is in. 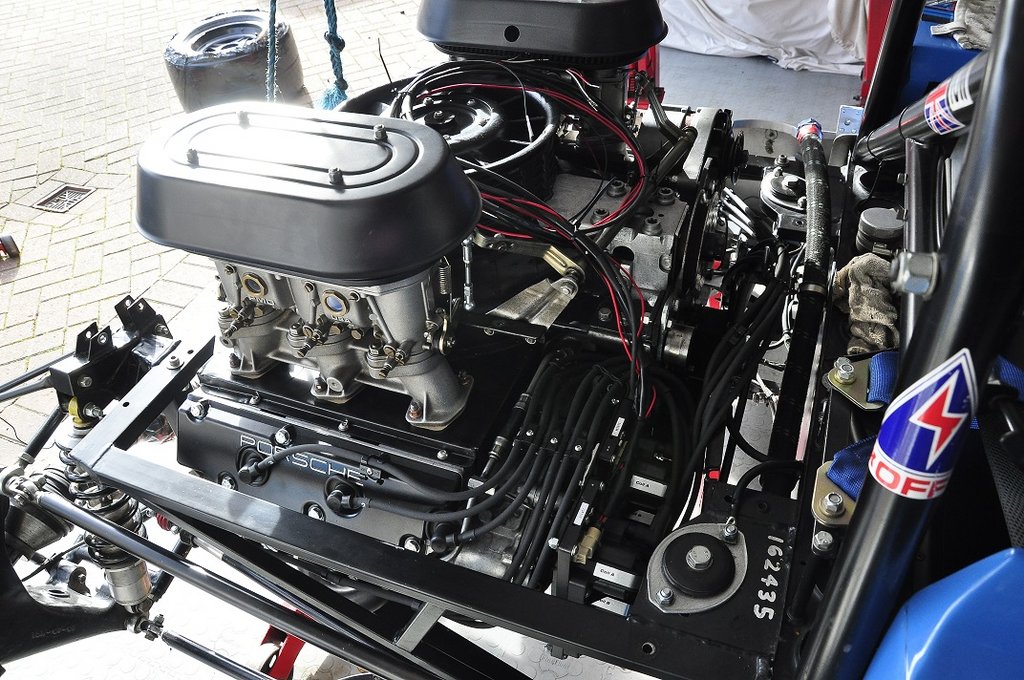 Next will be the electrics of the control unit and getting that to be powered by the current dashboard which may be a challenge. With that all done it is time to check the settings of the controller, pull the top 6 plugs out and churn the engine over to get oil everywhere. And then...add fuel, and pray. Last edited by 911thillclimber; 12 Feb 2022 at 16:05. |
||
|
|
|
|
21 Feb 2022, 15:02 (Ref:4099627)
|
#2622 | ||
|
Veteran
Join Date: Aug 2007
Posts: 1,974
|
Save me from wiring!
At very long last got to the end of all the wiring on this simple car. Takes ages and ages to do. The XDi controller is wired and in place, about the driest space I can imaging in this far from sealed car. Getting the pins into the large multi wire block was a real pain all refusing to simply push home. Had to open the whole connector up and do them. Hate it. Made a splash shield in ABS sheet velco'd to the unit. The unit is a heat sink, so air much freely pass around the exterior. The controller has to get to ground, power is needed (3 power lines) so they have to be 'enabled' only when the full ignition /fuel pump circuit is live. The kill toggle switch then shuts off power to the ignition and fuel simultaneously. They have to be individually fused too. All the gauges have to get 12V prior to that status, but all done finally. Put 12 litres of Shell's best oil into the engine... Put a refreshed mega red-top racing battery int the car, and connected it up.... Went to remove the top set of plugs. Plug spanner too short, so mad one the correct length... Pulled the 3 power leads to the XDi, no petrol in the car deliberately....just to ensure it would not start! Turned the electrics on and pressed the starter motor. All churned over for 30 seconds and got 3 bar oil pressure at cranking speed.  Put all6 top plugs back in with my new plug spanner and nipped them up. Cranked the engine over again for a few seconds, sure sound like a high compression engine! :bounce: No fuel means no first fire-up. Planning to do that on Wednesday afternoon once i have the silencers on. Too busy tomorrow and Wednesday morning. So nearly there, no excuses left, just the Moment of Truth. 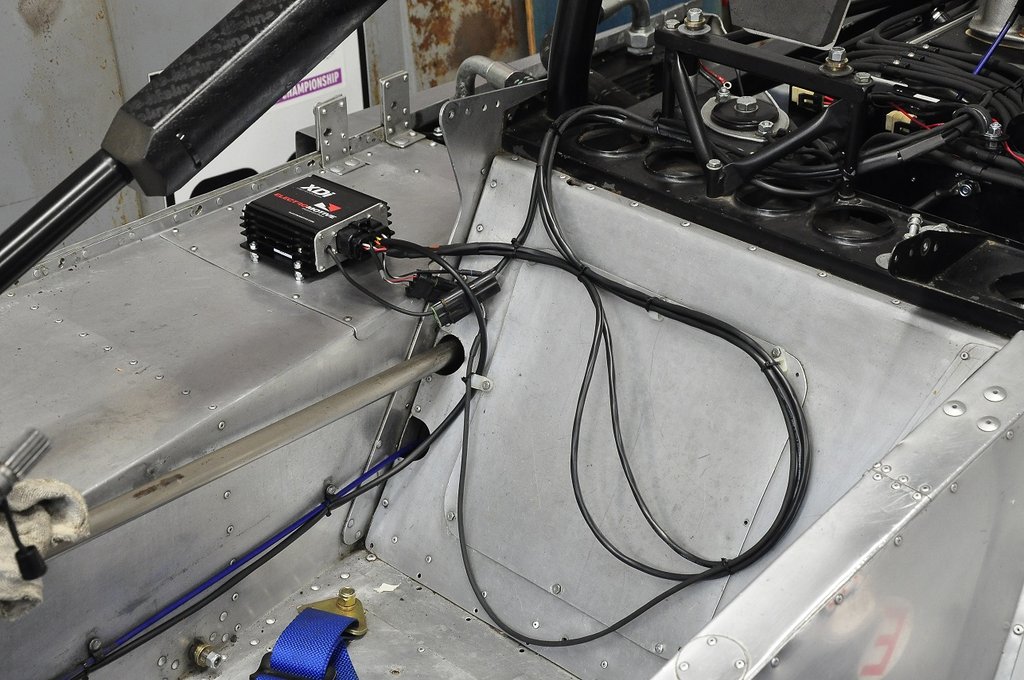 
|
||
|
|
|
|
21 Feb 2022, 15:14 (Ref:4099628)
|
#2623 | ||
|
Veteran
Join Date: Feb 2010
Posts: 6,082
|
Looking forward to the fire up. *Bet you are too!

|
||
|
|
|
|
21 Feb 2022, 19:02 (Ref:4099651)
|
#2624 | ||
|
Veteran
Join Date: May 2013
Posts: 10,046
|
You're right to pull the power leads when cranking without plugs. Some boxes dont appreciated that unless you keep the plugs connected. Enough talking. Maestro, music please!
|
||
|
|
|
|
23 Feb 2022, 17:30 (Ref:4099915)
|
#2625 | ||
|
Veteran
Join Date: Aug 2007
Posts: 1,974
|
Well!
Engine will not start. All turns over but not a pop, cough or fart. According to the Diagnostics fault finder, the crank sensor is at fault (which would account for the total lack of life), but the resistance of the sensor is 616 Ohms, and the general figure for a good one is 620 Ohms, so nothing wrong there. Have power where it should be and the right level, all grounds ok, all wires in the right holes in the ecu 23 pin connector. Have emailed Clewett for guidance, have a clear morning tomorrow i hope to look again with fresh eyes and a reply from Clewett. I hate car wiring. Damp squid and all that, but will sort it tomorrow I hope. |
||
|
|
|
 |
|
|
 Similar Threads
|
||||
| Thread | Thread Starter | Forum | Replies | Last Post |
| searching Lola T492 rear brake disc | dr46rossi | Motorsport History | 2 | 24 Nov 2009 17:27 |


 Linear Mode

